To use Client-Initiated Backchannel Authentication (CIBA) features, you must have an Enterprise Plan or an appropriate add-on. Refer to Auth0 Pricing for details.
authorization_details parameter contains details about the request that you can customize in a consent prompt to show the user.
You can authorize users with CIBA using the following notification channels:
- Mobile push notifications using the Auth0 Guardian app and a custom app integrated with the Auth0 Guardian SDK.
- Email notifications, which require setting a customized consent prompt.
Common use cases
Use RAR with the CIBA flow for use cases that require more fine-grained control over resource access. Common use cases include:- A payments app prompts the user to confirm a money transfer. The
authorization_detailscan be customized to show the transaction details. - An AI agent prompts the user with details about a rescheduled doctor’s appointment. The
authorization_detailscan be customized to show the new time and date.
How it works
The User Authorization with CIBA flow is similar to the User Authentication with CIBA flow, where RAR support enables clients to pass theauthorization_details to the authorization server via the /bc-authorize endpoint.
The following sequence diagram explains the end-to-end User Authorization with CIBA flow:
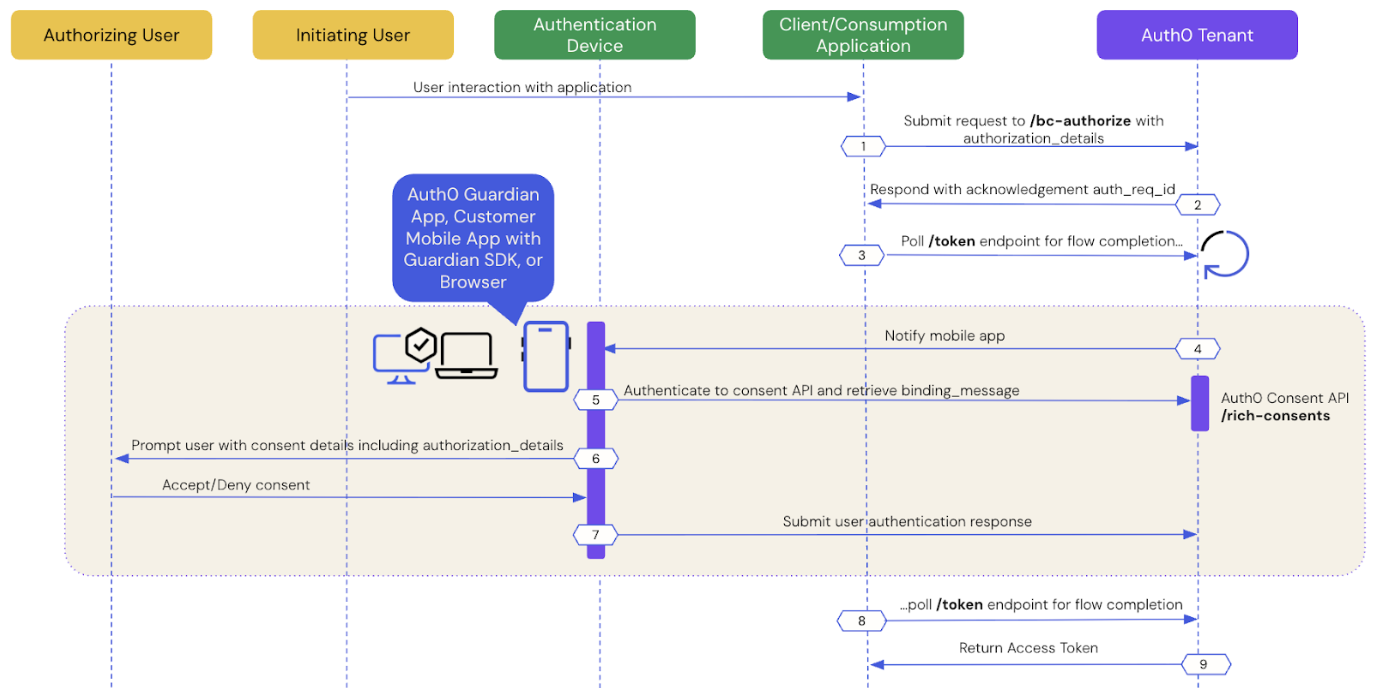
- Prerequisites
- Step 1: Client application initiates a CIBA request
- Step 2: Auth0 tenant acknowledges the CIBA request
- Step 3: Client application polls for a response
- Step 4: Authentication device receives the push notification
- Step 5: Authentication device retrieves the consent details
- Step 6: Authentication device presents the consent details to the user
- Step 7: Authentication device sends the user response back to Auth0
- Step 8: Auth0 receives user response after the flow completes
- Step 9: Auth0 returns access token to the client application
Prerequisites
To initiate a CIBA request using Auth0, you must:- Configure Client-Initiated Backchannel Authentication for your tenant and application, including your notification channel.
- Configure Rich Authorization Requests for your , which includes registering your
authorization_detailstypes. - If you’re using email notifications with CIBA with RAR, set a customized consent prompt.
Step 1: Client application initiates a CIBA request
Use the User Search APIs to find the authorizing user for whom you’d like to initiate a CIBA request and obtain their user ID. Once you have a user ID for the authorizing user, use the Authentication API to send a CIBA request with theauthorization_details to the /bc-authorize endpoint:
| Parameters | Description |
|---|---|
tenant | Tenant name that is passed within the login_hint structure. It can also be a custom domain.Example: login_hint={"format": "iss_sub", "iss": "https://$tenant/", "sub":"$user_id"} |
client_id | Client application identifier. |
client_secret | Client authentication method used for user authentication with CIBA, such as Client Secret, Private Key JWT, or mTLS Authentication. If you’re using Private Key JWT or mTLS, you don’t need to include the client secret. |
scope | If the client needs to identify the user (i.e., obtain an id_token), openid must be included. If the client only needs an access token for authorization, openid is optional, but commonly included.The scope can optionally include offline_access to request a refresh token. However, for one-time authorization of a transaction with the CIBA Flow, a refresh token is not needed and does not have any meaning in this context. |
user_id | User ID for the authorizing user that is passed within the login_hint structure. If iss_sub format is used, then the user ID is passed within the sub claim. Example: login_hint={"format": "iss_sub", "iss": "https://$tenant/", "sub":"$user_id"} The user ID for a federated connection may have a different format. |
requested_expiry | The CIBA flow’s requested expiry is between 1 and 259200 (72 hours) seconds, and it defaults to 300 seconds. Include the requested_expiry parameter to set a custom expiry for the CIBA flow.The requested_expiry parameter helps determine which notification channel CIBA uses:
|
binding_message | Human-readable message used to bind the CIBA flow across the authentication and consumption devices. The binding message is required and up to 64 characters. Use only alphanumeric and +-_.,:# characters |
audience | Unique identifier of the audience for the issued token. |
authorization_details | An optional JSON array of objects that describes the permissions to be authorized. You should register each object’s type value on the resource server using the resource server’s authorization_details parameter. To learn more, read Configure Rich Authorization Requests. |
Step 2: Auth0 tenant acknowledges the CIBA request
If the Auth0 tenant successfully receives thePOST request, you should receive a response containing an auth-req-id that references the request:
auth_req_id value is passed to the /token endpoint to poll for the completion of the CIBA flow.
Step 3: Client application polls for a response
Use the Authentication API to call the/token endpoint using the urn:openid:params:grant-type:ciba grant type and the auth_req_id you received from the /bc-authorize endpoint:
- cURL
- C#
- Go
- Java
/token endpoint.
Step 4: Authentication device receives the notification
Depending on the notification channel, Auth0 sends a notification to the authentication device:- Mobile push notification: Auth0 sends it to the Auth0 Guardian app or a custom mobile app integrated with the Auth0 Guardian SDK.
- Email notification: Auth0 sends it to the user’s verified email address.
Step 5: Authentication device retrieves the consent details
The authentication device retrieves the consent details i.e. the contents of thebinding_message from the Auth0 Consent API:
- Mobile push notification: The Auth0 Guardian app or a custom app integrated with the Auth0 Guardian SDK calls the Auth0 Consent API to retrieve the consent details.
- Email notification: When the user clicks on the verification link, they are redirected to the browser, which retrieves the consent details from the Auth0 Consent API.
Step 6: Authentication device presents the consent details to the user
The Auth0 Consent API responds to the authentication device with the consent details, including thebinding_message, scope, audience, and authorization_details if configured. The scopes returned to the mobile application are filtered according to your RBAC policy. To learn more, read Role-Based Access Control.
The following code sample is an example response from the Auth0 Consent API:
authorization_details to the user:
- Mobile push notification: The Auth0 Guardian app renders the
authorization_detailsin a consent screen using a push notification. - Email notification: The browser renders the
authorization_detailsin a custom consent screen. To learn how to customize the consent screen, read Set customized consent prompt.
Step 7: Authentication device sends the user response back to Auth0
After the user accepts or declines the authorization request, the authentication device sends the user response back to Auth0:- Mobile push notification: The Auth0 Guardian app or a custom app integrated with the Auth0 Guardian SDK sends the user response back to Auth0.
- Email notification: The browser sends the user response back to Auth0.
Step 8: Auth0 receives user response after the flow completes
The client application completes the polling upon receiving a response from the/token endpoint. A CIBA flow always requires a response, either an approval or decline, from the authorizing user, and existing grants are not checked. This means Auth0 treats every CIBA request as a fresh authorization for the authorizing user.
Step 9: Auth0 returns access token to client application
If the user rejects the push request, Auth0 returns an error response like the following to the client application:authorization_details like the following to the client application:
refresh_token will only be present if the offline_access scope was included in the initial /bc-authorize request.
Query authorization_details
At compile time, you can query the type and objects ofauthorization_details from the consent details in a strongly typed manner as you would dynamically query JSON:
- iOS
- Android
filterAuthorizationDetailsByType() function to return all authorization_details objects that match the desired type.
The following code sample queries authorization_details with the payment type:
- iOS
- Android
filterAuthorizationDetailsByType() only returns objects matching the specified authorization_details type. As a result, your mobile application should present all relevant authorization_details to the user for consent, regardless of their type, to ensure a complete understanding of the request
You can also query the authorization_details when the AI agent or application polls the /oauth/tokenendpoint for a response:
| Parameters | Description |
|---|---|
grant_type | Set to the CIBA grant type: urn:openid:params:grant-type:ciba |
client_id | Set to the application’s client ID. |
client_secret | Set to the application’s client secret. |
auth_req_id | Returned from the Auth0 tenant when it acknowledges the CIBA request. References the CIBA request. |
authorization_details array:
Limitations
Auth0 doesn’t support:- Modifying RAR in Actions for CIBA flows.
- Advertising RAR types for clients to discover, which means you need to pre-register clients with the
authorization_detailstypes they can send. - Validating RAR objects beyond checking that they have a
typeproperty that matches allowed types for the API. Your resource server is responsible for the granular validation of the content withinauthorization_details. For more information, see Configure RAR.